
Licenses
Licenses – is the certification you have received from a governmental or other regulatory agency that authorizes you to carry out a particular activity.
Select the Licenses link within the myTalent toolbox.
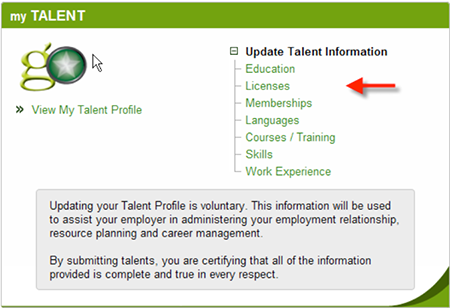
If no license talents have been entered, the display will state ‘You currently do not have any license records listed.’ If license talents are on file within Gateway Online, these will be displayed.

Select ADD to open up the License Details form.
Complete the License Details section.
Note: Gold asterisks (*) indicate that particular field is mandatory; it must be completed prior to the system allowing you to add that record.
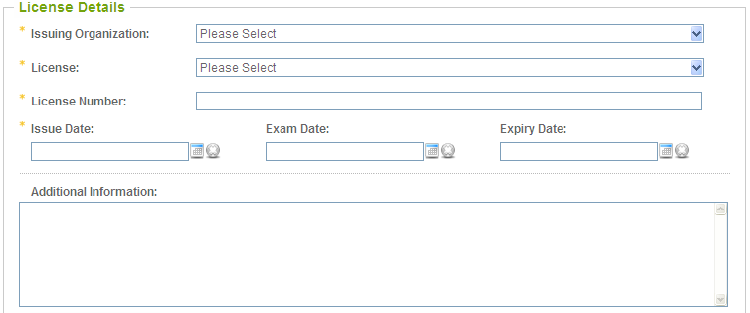
Issuing Organization: Select the organization that issued the license.
License: Select the license.
License Number: Enter the license number.
Issue Date: Specify issue date of the license.
![]() This symbol opens up a calendar when it is clicked on.
This symbol opens up a calendar when it is clicked on.
![]() This symbol deletes the information that has been placed in that field.
This symbol deletes the information that has been placed in that field.
Exam Date: Specify exam date, if applicable.
![]() This symbol opens up a calendar when it is clicked on.
This symbol opens up a calendar when it is clicked on.
![]() This symbol deletes the information that has been placed in that field.
This symbol deletes the information that has been placed in that field.
Expiry Date: Specify expiry date of the license. The expiry date may be mandatory for some licenses.
![]() This symbol opens up a calendar when it is clicked on.
This symbol opens up a calendar when it is clicked on.
![]() This symbol deletes the information that has been placed in that field.
This symbol deletes the information that has been placed in that field.
Additional Information: Enter any additional information you feel is required.
Should you have a document supporting this license talent, it can be uploaded into Gateway Online by selecting the + NEW ATTACHMENT within the File Attachments section of this form. Choose the applicable file to be uploaded.

Once the required fields have been completed, select and your changes will be saved. You will then be re-directed to view your information in a read-only format.
Select the Licenses link within the myTalent toolbox.
Existing license records will appear in a read only format (as per below).
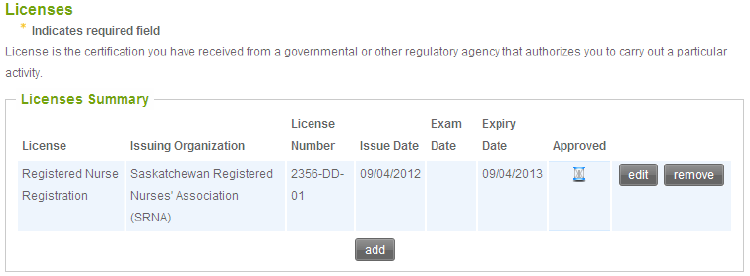
To edit a license talent, select the EDIT button to the right of the talent.
The License form will open up displaying the current values for each of the fields. Amend the form as required.
Once you are satisfied with the amendments, select SUBMIT and your changes will be saved. You will then be re-directed to view your information in a read-only format.
In order to reissue a License, it must have already been approved by your Employer, appear in the Licenses Summary as APPROVED, and an expiry date must have been set for the license.
Select the Licenses link within the myTalent toolbox.
Existing license records will appear in a read only format (as per below).
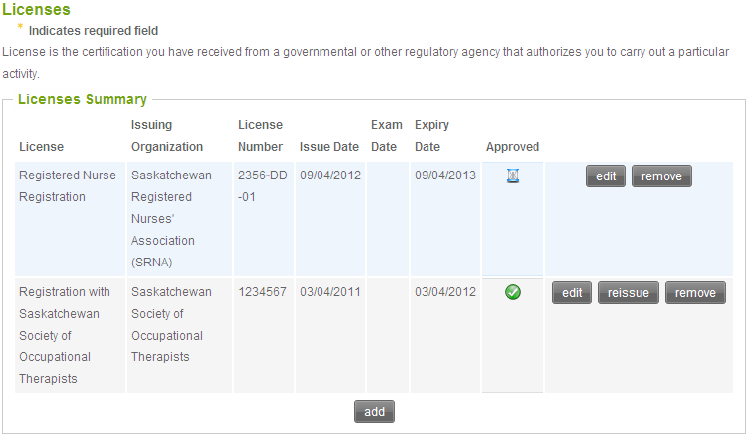
To reissue a License talent, select the REISSUE button to the right of the talent.
The License form will open up, allowing you to update the form with the current information. Once you have input the required information (i.e. new issue date) and attached any applicable files, select SUBMIT and your changes will be saved. You will then be re-directed to view your information in a read-only format.
Note: Removal of a talent is a deletion of the record, not an expiration of the record.
Select the Licenses link within the myTalent toolbox.
Existing licenses records will appear in a read only format (as per below).
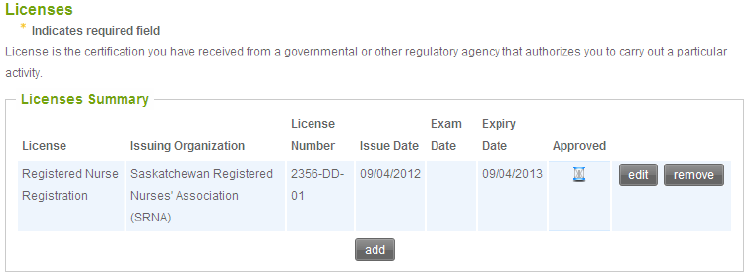
To remove a License talent, select the REMOVE button to the right of the talent.
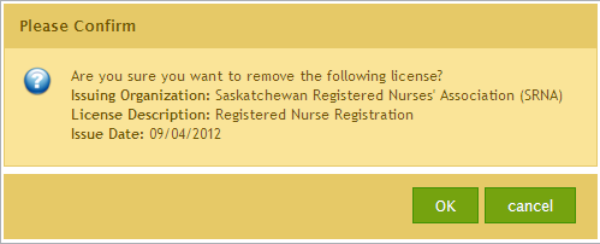
A message will appear asking you to confirm the deletion of the license talent. If you select OK the record will be removed. If you select Cancel the record will remain as it was.
Workflow Console Tasks
Any Licenses talent changes/additions submitted through GO need to be approved by your employer. A Talent Approver role has been set up in your organization to receive notifications of these Licenses talents. Once you submit your Licenses talent, a workflow notification will be created. You can see and track this workflow notification in your Workflow Console, otherwise known as Tasks. The Tasks tab can be found on the left of your screen (see picture below).

Clicking on the Tasks icon, will open up a second window presenting three tabs - To Do List, In Progress, and Completed, where you can track your tasks.

When you submit an Licenses talent, a task will be created and displayed in your In Progress tab.

To view the details of the task, click the [view] button under the Details column.
The Talent Approver will either Approve or Reject the talent. If the talent is approved, you will see the task in your Completed tab as well as see the talent as approved in your myTALENT Toolbox Summary.
If the Talent Approver rejects the talent, you will see the task in your To Do List tab as ‘TALENT’-Rejection. You have two options:
1. Acknowledge the rejected talent by selecting the acknowledge button with the option to enter comments in the Task Actions section. Once acknowledged the task moves from your To Do List tab to your Completed tab with a status of Completed.
2. Edit the original Talent and resubmit it for approval. To edit the original talent, you can:
a. go into the myTALENT Toolbox and make amendments. Upon clicking submit, the original (rejected) workflow notification will move to the Completed tab for both you and your employer’s Talent Approver with the status of Cancelled, AND a new workflow for the edited talent will be created thus requiring a new approval/rejection from the Talent Approver; OR
b. within the Task Details section click on the hyperlink (Please click HERE to correct the entry and resubmit) which will take you directly to the myTALENT Toolbox Summary where amendments can be made. Upon clicking submit, the original (rejected) workflow notification will move to your Completed tab with the status of Cancelled, AND a new workflow for the edited talent will be created thus requiring a new approval/rejection from the Talent Approver.
Click here for more information about the Workflow Console Tasks.
Top of Page

